
If you work in the .NET ecosystem and need to build real-time communication applications, SignalR is usually the first choice. But I often see developers confusing SignalR with WebSocket, and it's worth understanding why SignalR is not just WebSocket.
WebSockets vs. SignalR
What is a WebSocket?
WebSocket is a communication protocol, a persistent full-duplex connection between client and server over TCP. It is "just" transport: you send bytes, you receive bytes. It does not define a message format or any application logic.
It starts with an HTTP request asking to upgrade the connection (more on this handshake later). Once the server accepts it (101 Switching Protocols), the connection stops being HTTP and becomes just a stream of bytes. The WebSocket protocol knows nothing about methods, JSON, users, or groups. All of that is the application's responsibility.
You can picture the WebSocket as a pipe that carries bytes between client and server, with no knowledge of what those bytes mean.
flowchart LR
  Client <== Bytes ==> Server
What is SignalR?
SignalR is an abstraction library on top of several transports (WebSocket, Server-Sent Events, Long Polling). On the server side, it adds concepts like hubs, remote method invocation, client groups, and user management. On the client side, it provides libraries that handle message serialization and automatic reconnection. And, importantly for this article, it defines its own message protocol on top of the transport.
Quick comparison
| WebSockets | SignalR |
|---|---|
| Protocol | Library |
| RFC 6455 | ASP.NET library |
| Sends bytes or text | Sends serialized messages (JSON or MessagePack) |
| You have to build your own protocol | SignalR protocol already defined |
| No automatic reconnection | Reconnection supported |
| No user management | User management built in |
| No groups | Groups built in |
| No broadcast | Broadcast built in |
| Works with any technology | Server in ASP.NET, clients for .NET, JS/TS and Java |
| No specific client required | Needs a client compatible with the SignalR protocol |
All of this makes development with SignalR extremely simple, but it also makes testing quite a bit harder when you don't have those same abstractions available. That problem is exactly what led me to write this article: understanding a few details of the SignalR protocol so you can run tests when you don't have a SignalR client at hand.
What SignalR adds
SignalR uses that "pipe" to implement an RPC protocol. Instead of pushing unstructured data, it sends structured messages with meaning (a type, a target, arguments...). That makes calling a remote method as simple as:
await hubConnection.InvokeAsync("SendMessage", message);
But there's actually a fair amount of protocol behind it.
How a SignalR connection works
The connection has three phases:
negotiate: the client makes aPOSTto/hub/negotiateand receives a temporaryconnectionToken.WebSocket: the client opens the WebSocket connection using that token:ws://{host}/hub?id={connectionToken}.handshake: the first message sent over the socket is a JSON message telling SignalR which protocol the client will use.
sequenceDiagram
  Note over Client,Server: 1. negotiate
  Client->>Server: POST /hub/negotiate
  Server-->>Client: connectionToken

  Note over Client,Server: 2. WebSocket
  Client->>Server: ws://{host}/hub?id={connectionToken}
  Server-->>Client: 101 Switching Protocols

  Note over Client,Server: 3. handshake
  Client->>Server: JSON {"protocol":"json","version":1}
  Server-->>Client: {}

  Note over Client,Server: Connection established
Only after the handshake does the hub consider the connection established.
These last two phases are exactly what make testing SignalR harder than testing a plain WebSocket: it's not just a WebSocket, but a complete protocol on top of it.
The SignalR handshake
Right after opening the WebSocket, the client sends a SignalR handshake message. In other words: opening a WebSocket to a SignalR endpoint is not enough. SignalR expects to receive a specific handshake right after the connection. Without it, the hub never considers the connection "ready", and if the handshake doesn't arrive within the server's handshake timeout, the server closes the connection.
{
  "protocol": "json",
  "version": 1
}
In practice, it's sent on a single line, terminated by the record separator (␞):
{"protocol":"json","version":1}␞
protocol- Serialization protocol used, eitherjsonormessagepackversion- SignalR protocol version
But the payload actually sent over the wire is:
7b2270726f746f636f6c223a226a736f6e222c2276657273696f6e223a317d1e
| Hex | Chars |
|---|---|
7b | { |
22 | " |
70 72 6f 74 6f 63 6f 6c | protocol |
3a | : |
6a 73 6f 6e | json |
2c | , |
76 65 72 73 69 6f 6e | version |
31 | 1 |
7d | } |
1e | 0x1E |
But doesn't the handshake already exist?
This is one of the points that causes confusion: the word handshake. The first thing that comes to mind is: "But the handshake also exists in WebSocket, doesn't it?" And yes, it does, but they're different things. In fact, if we think about the whole process of establishing a connection, there are several handshakes at different layers of the stack:
flowchart TD
  TCP --"TCP Handshake (3-Way Handshake)"-->
  TLS["TLS (wss:// only)"] -- "TLS Handshake" -->
  WebSocket["WebSocket"] -- "WebSocket Opening Handshake<br/>(HTTP GET + Upgrade → 101)" -->
  SignalR["SignalR"] -- "SignalR Handshake<br/>(JSON)" --> SignalRMessages[SignalR Messages]
These are four different things.
1. TCP Handshake
This is the famous 3-way handshake, whose responsibility is to establish the TCP connection. SignalR doesn't even know this happened. It's the responsibility of the operating system and the TCP/IP stack.
sequenceDiagram
  Client->>Server: SYN
  Server-->>Client: SYN + ACK
  Client->>Server: ACK
2. TLS Handshake (only for wss://)
If you're using secure WebSockets (wss://), before HTTP there's also the TLS handshake to negotiate certificates, keys, and cipher algorithms.
3. WebSocket Handshake
This one is defined by RFC 6455.
It's an HTTP Upgrade:
GET /demo-hub HTTP/1.1
Upgrade: websocket
Connection: Upgrade
Sec-WebSocket-Key: ...
Sec-WebSocket-Version: 13
The server responds:
HTTP/1.1 101 Switching Protocols

Upgrade: websocket
Connection: Upgrade
Sec-WebSocket-Accept: ...
4. SignalR Handshake
This is where SignalR comes in.
As soon as the WebSocket is established, the client immediately sends:
{"protocol":"json","version":1}␞
If the server accepts the protocol, it replies with an empty JSON, also terminated by a record separator:
{}␞
Without the handshake response, the connection is not considered established.
Record Separator
If you look closely, you'll see the message ends with a special byte, called the Record Separator.
It's the delimiter used by the SignalR protocol. It's what tells SignalR where a message ends. Without it, SignalR receives text but can't tell where the first message ends, and the handshake never completes.
Why does the Record Separator exist?
SignalR is transport-agnostic, and not every transport preserves message boundaries: Server-Sent Events and Long Polling are just text/byte streams. Even on a WebSocket, SignalR can batch several messages into a single frame. Without a delimiter, they're indistinguishable:
Message1Message2Message3
So SignalR separates each message with the byte 0x1E (␞):
Message1␞Message2␞Message3␞
That way, the ␞ marks the end of each message.
Anatomy of a SignalR message
SignalR messages are identified by the type field, which determines the structure and meaning of the message. The main types are:
| Type | Name | Function |
|---|---|---|
| 1 | Invocation | Invoke a remote method (optionally waiting for a result) |
| 2 | StreamItem | Send an item from a data stream |
| 3 | Completion | Complete a stream or return a final result |
| 4 | StreamInvocation | Invoke a remote method that returns a stream |
| 5 | CancelInvocation | Cancel an invocation or stream in progress |
| 6 | Ping | Keep the connection alive |
| 7 | Close | Close the connection gracefully |
Example: remote method invocation
A simple invocation example:
{
  "type": 1,
  "target": "ReceiveMessage",
  "arguments": [
    "Hello"
  ]
}
Which, on the wire, is sent on a single line, terminated by the record separator:
{"type":1,"target":"ReceiveMessage","arguments":["Hello"]}␞
type- Type1: remote method invocation (Invocation)target- Name of the remote method to invokearguments- Arguments sent to the remote method
Example: keep-alive (Ping)
A ping is a message with type 6:
{"type":6}␞
The ping is SignalR's heartbeat (keep-alive). Either side can send one at any time, and the receiver has no obligation to reply. Unlike the WebSocket protocol's own ping/pong, there is no "pong" here. By default, ASP.NET Core pings in both directions on active connections, so if the client stops seeing server pings (and there's no other traffic), it assumes the connection is gone and closes it.
The main friction points when testing SignalR
Before we get to the tools, it's worth summarizing the main friction points that make testing SignalR harder:
- It's not a single HTTP request. It's a sequence: negotiate (HTTP) → WebSocket → handshake (a message inside the socket). Traditional HTTP testing tools don't cover this natively.
- The negotiation token has a limited lifetime. The
connectionTokenmaps to a connection created by the server duringnegotiate; if you take too long to open the WebSocket, that connection no longer exists and the server returns404. - The WebSocket connection on its own isn't enough. A lot of people open the socket, don't send the handshake, and assume SignalR "isn't working", when it's actually waiting for the first message.
- The
␞delimiter is easy to forget, especially when writing the payload by hand or generating messages programmatically without the official client.
How to view SignalR messages
There are several ways, but let's use the simplest one: open the browser DevTools and watch the WebSocket traffic.
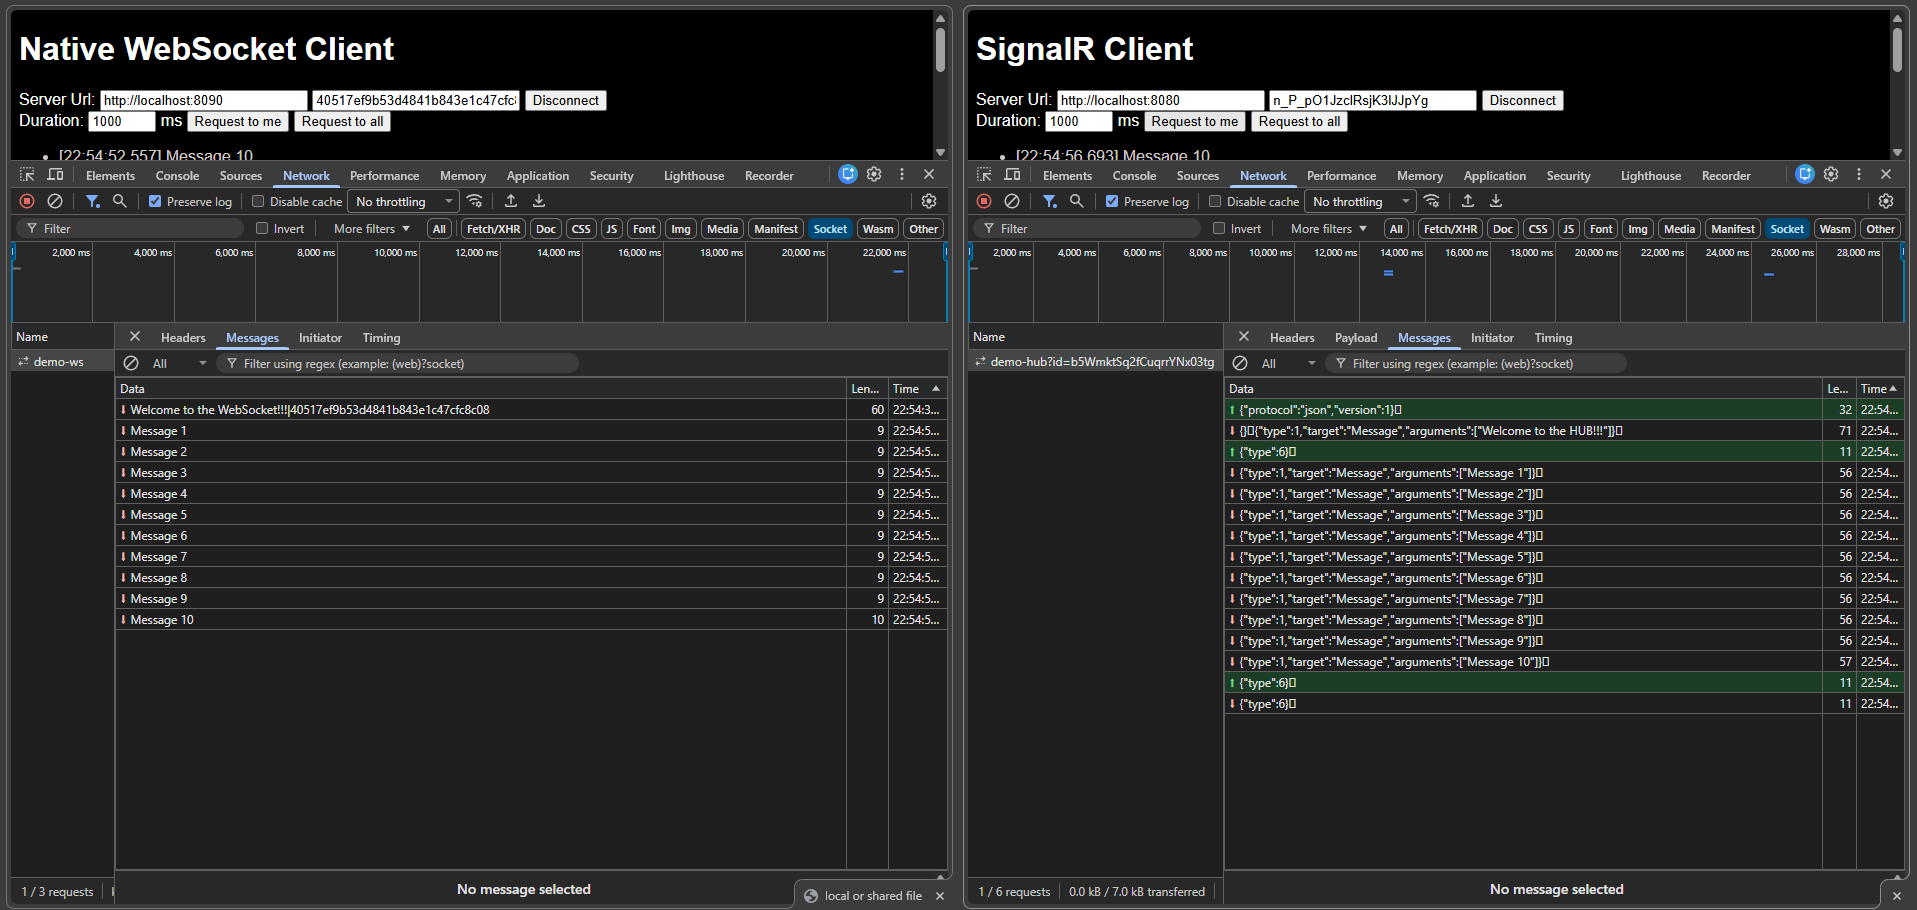
As you can see in the image, on the left we have a raw WebSocket connection, carrying only the application's final data. On the right, a SignalR connection, where you can see handshake messages, remote method invocations, and keep-alive pings. Notice too that SignalR messages follow a different payload structure, with the 0x1E delimiter at the end of each message.
How to test SignalR without the official client
I'll show two tools that are widely used during development: Postman, for manual tests, and k6, for load tests. Both are great, but neither has native support for SignalR. That means you have to build the SignalR protocol on top of the WebSocket by hand.
Manual tests with Postman
Recent versions of Postman support WebSockets, but only the raw protocol. It can open the connection, but it doesn't know about:
- negotiate
- handshake
- protocol framing
- invocations
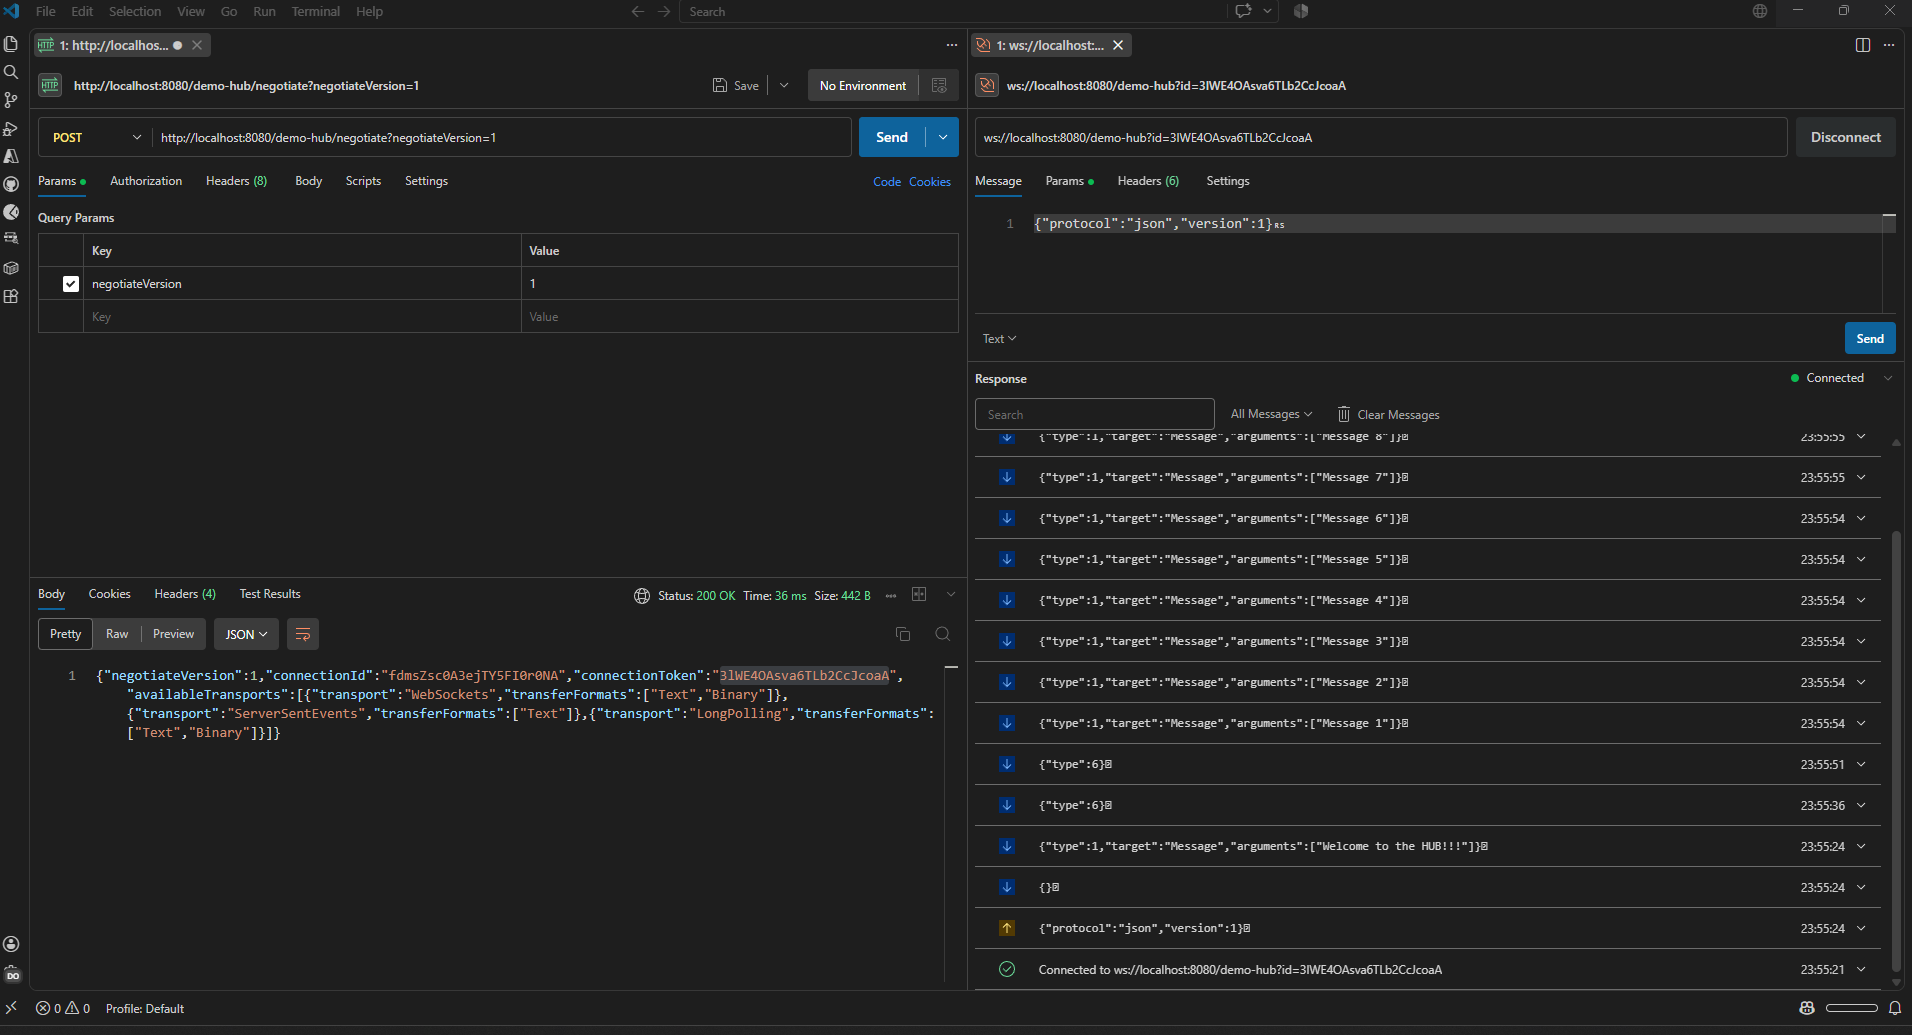
You have to build everything by hand. To test the full flow, including the WebSocket:
1. Negotiate (agree on transport, get the connection token)
POST: http://{{HOST}}/demo-hub/negotiate?negotiateVersion=1 and copy the connectionToken from the response.
What is
negotiateVersion=1? It's the version of the negotiation protocol (not to be confused with the SignalR protocol version in the handshake).
negotiateVersion=0: legacy format, the response returns only aconnectionId, which is used as theidwhen opening the transport.negotiateVersion=1: current format, the response also returns a separateconnectionToken(kept secret), which is the value you use as theidwhen opening the transport, whileconnectionIdbecomes a stable public identifier.Always use
negotiateVersion=1: it's the modern format and gives you theconnectionTokenthe transport expects. (The list of available transports is the same either way.)
{
  "negotiateVersion": 1,
  "connectionId": "fdmsZsc0A3ejTY5FI0r0NA",
  "connectionToken": "3lWE4OAsva6TLb2CcJcoaA",
  "availableTransports":
  [
    { "transport": "WebSockets", "transferFormats": ["Text", "Binary"] },
    { "transport": "ServerSentEvents", "transferFormats": ["Text"] },
    { "transport": "LongPolling", "transferFormats": ["Text", "Binary"] }
  ]
}
Difference between
connectionIdandconnectionToken:
connectionId: a readable identifier for the connection, used to send messages to a specific connection, logging, debugging, etc. (e.g. "fdmsZsc0A3ejTY5FI0r0NA")connectionToken: a temporary token that ties the transport connection to the one created duringnegotiate, required to open the WebSocket (e.g. "3lWE4OAsva6TLb2CcJcoaA")Always use the
connectionTokenon the WebSocket, not theconnectionId.
2. WebSocket (open the connection)
Open a new WebSocket Request to ws://{{HOST}}/demo-hub?id={{connectionToken}}.
3. Handshake (send the protocol)
- As soon as the socket connects, send this as the first message:
{"protocol":"json","version":1}␞. - If the handshake is accepted, you're ready to send and receive SignalR messages.
Load tests with k6
k6 has WebSocket support and can hold thousands of concurrent connections, which makes it a great base for load testing applications.
The challenge is exactly the same as with Postman: k6 knows WebSockets, but it doesn't know SignalR.
For realistic load, each virtual user has to run the full negotiate → WebSocket → handshake cycle, so HTTP requests alone aren't enough, you also need the k6/ws module to open the socket.
Here's an example script with those steps implemented:
import { check, sleep } from 'k6';
import http from 'k6/http';
import ws from 'k6/ws';

const API_HOST = __ENV.API_HOST || 'http://localhost:8080';
const DURATION = parseInt(__ENV.DURATION || '1000');
const WS_HOST = API_HOST.replace(/^http/, 'ws');

// SignalR frames are delimited by ASCII record separator (0x1e)
const RS = String.fromCharCode(30);

export default () => {
  const negotiateRes = http.post(`${API_HOST}/demo-hub/negotiate?negotiateVersion=1`);
  check(negotiateRes, { 'negotiate: status 200': (r) => r.status === 200 });

  const { connectionId, connectionToken } = JSON.parse(negotiateRes.body);

  let handshakeOk = false;
  let messagesReceived = 0;

  const wsRes = ws.connect(
    `${WS_HOST}/demo-hub?id=${encodeURIComponent(connectionToken)}`,
    null,
    (socket) => {
      socket.on('open', () => {
        socket.send(`{"protocol":"json","version":1}${RS}`);
      });

      socket.on('message', (data) => {
        // Loop through all frames in the message (there may be multiple frames in a single message)
        for (const frame of data.split(RS).filter(Boolean)) {
          const msg = JSON.parse(frame); // parse the frame as JSON
          if (Object.keys(msg).length === 0) {
            // handshake ack, trigger the demo stream targeted at this connection
            handshakeOk = true;
            http.get(`${API_HOST}/demo?duration=${DURATION}&connectionId=${connectionId}`);
          } else if (msg.type === 1) {
            messagesReceived++;
          }
        }
      });

      socket.setTimeout(() => socket.close(), 2000);
    }
  );

  check(wsRes, { 'ws: upgraded (101)': (r) => r && r.status === 101 });
  check({ handshakeOk, messagesReceived }, {
    'ws: handshake completed': (r) => r.handshakeOk,
    'ws: received streamed messages': (r) => r.messagesReceived > 0,
  });

  sleep(1);
}
Conclusion
SignalR greatly simplifies building real-time applications in .NET, but that simplicity hides a fairly sophisticated protocol.
While a WebSocket only carries bytes, SignalR adds a full communication layer, including negotiation, handshake, method invocation, pings, streaming, and connection lifecycle management.
That abstraction is exactly what makes development more productive and testing more challenging.
Understanding what really happens "on the wire" helps not only to diagnose problems but also to build test tools that are more reliable and closer to reality.